Using your thermostat
Using your thermostat
Whatever thermostat your home uses, Control4 gives you an easy-to-use interface for adjusting the climate. You can control temperature, humidity, and fan settings from your home or across the globe.
Control4 does more than just provide a pretty face to climate control—it lets you create a variety of set points (temperature ranges) and associate them with schedules or events in your home automation system. For example, you can begin cooling down your house 30 minutes before you come home from work, or it can start automatically whenever you enter the front door.
![]() Video: Controlling the Thermostat
Video: Controlling the Thermostat
Checking the indoor climate
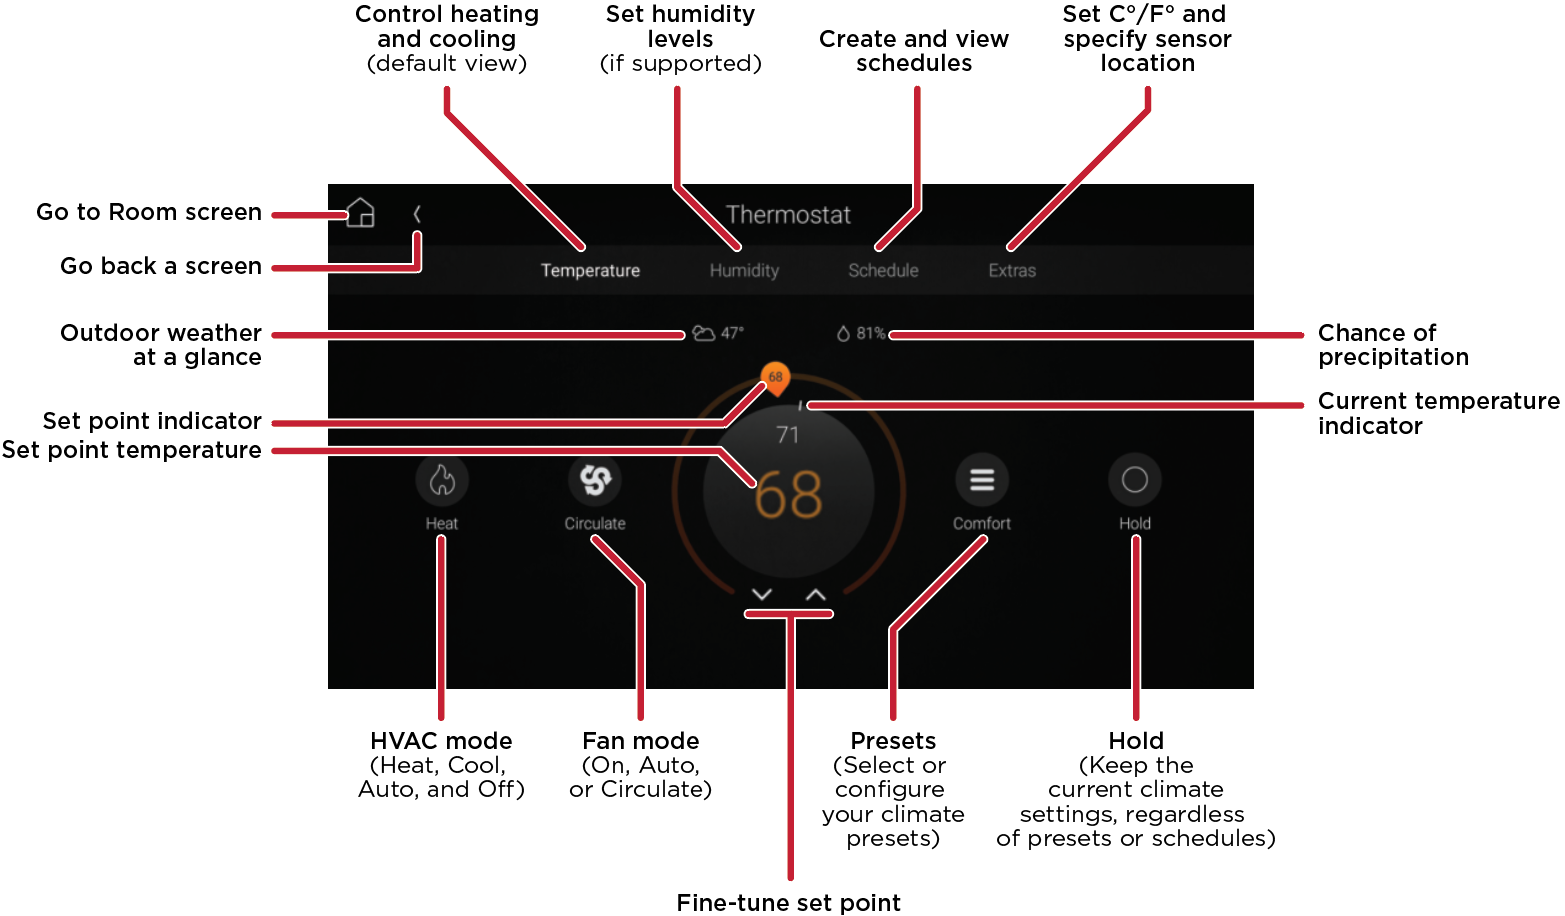
At a glance, you can see the current room temperature and the active heating/cooling mode of your HVAC system.
To check the indoor temperature:
- Select any room containing a thermostat control. If the thermostat is visible in only one room's view, either change to that Room screen or ask your Smart Home Pro to make it visible in other rooms.
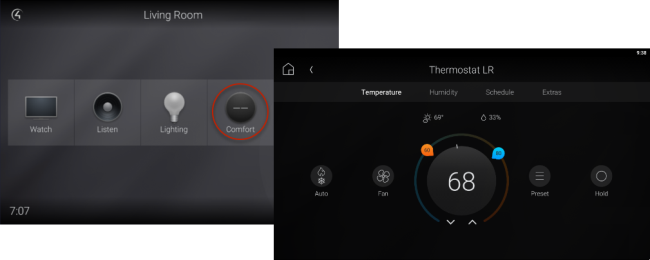
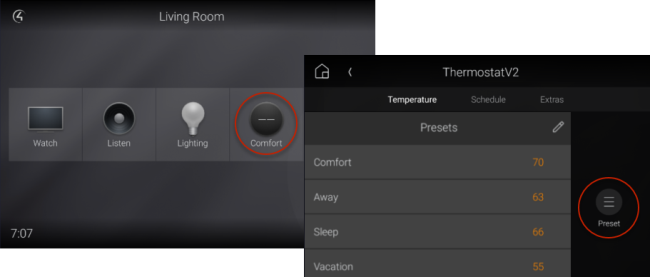
Open the room's Room menu, then select Comfort.
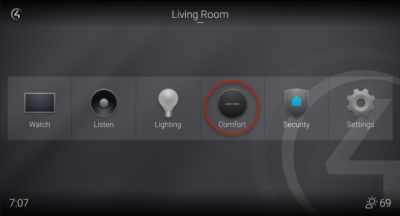
Climate-related icons appear.
Look at the circular thermostat temperature icon.
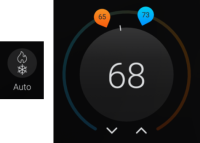
The number in the center indicates the current room temperature, and the heat/cold icons tell you what mode the HVAC is currently operating in. If both heat and cold icons are visible, the HVAC is in "auto" mode. If only a small "O" is visible at the bottom, the HVAC is off.

To check the indoor humidity:
- Select any room's Thermostat icon.
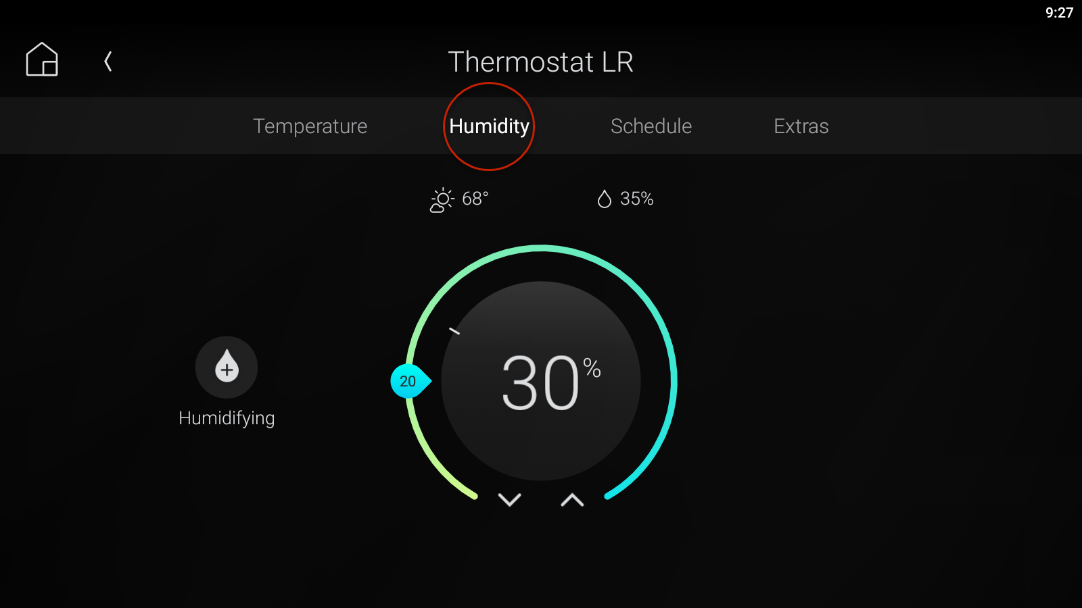
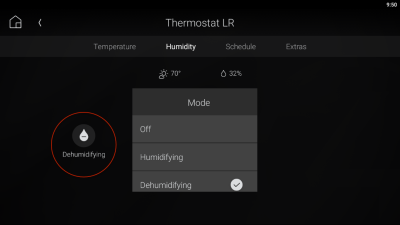
In the Thermostat screen, select Humidity at the top of the screen. The Humidity screen opens.

The large number in the center indicates the humidity, the teardrop marker indicates the humidity set point, and the icon at the bottom of the screen indicates the current humidifying mode.
Checking the outdoor weather
To check the outdoor weather:
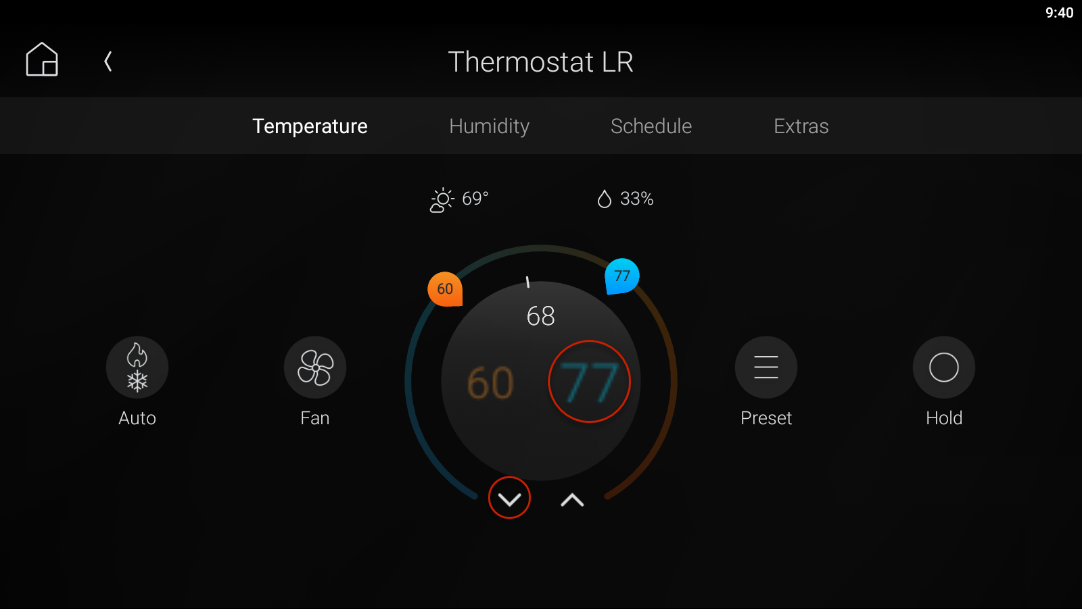
In a Room menu, select Comfort, then select Thermostat. Above the indoor temperature setpoint indicators, the current outdoor weather is displayed (cloudiness, temperature, and chance of precipitation).

To check the outdoor weather and forecast:
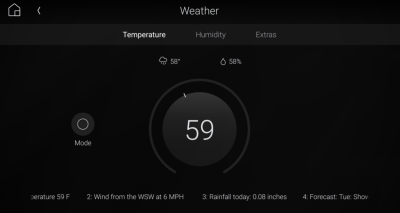
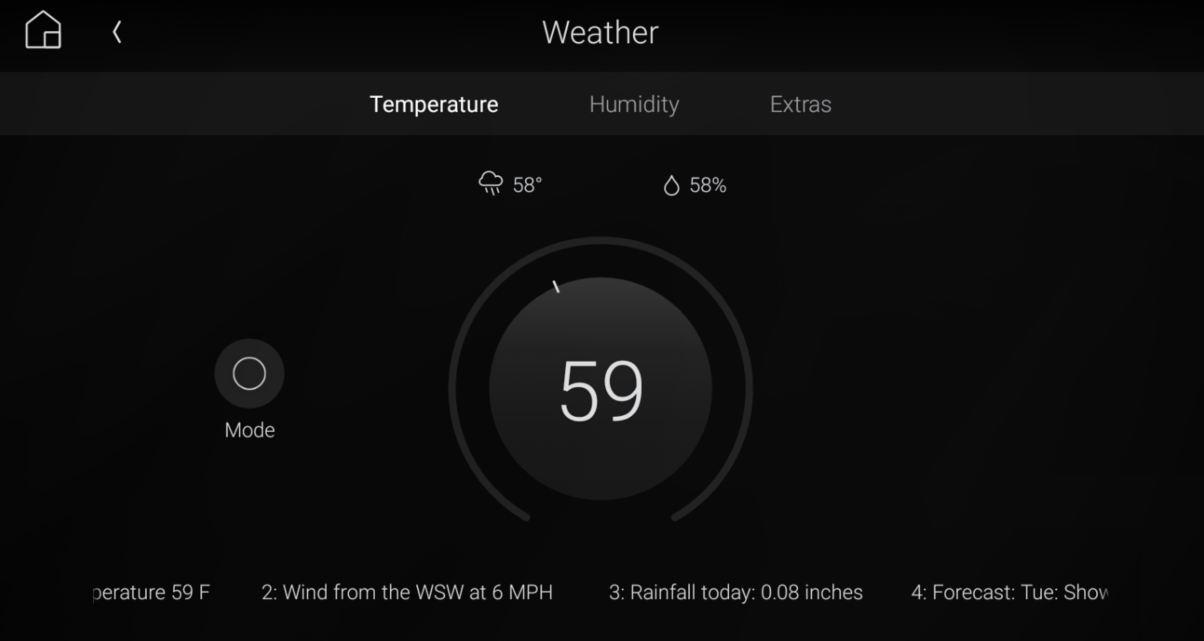
In a Room menu, select Comfort, then select Weather. The current temperature and humidity are prominently displayed, along with scrolling forecast at the bottom of the screen. If the weather icon is not visible, ask your Smart Home Pro to add the Weather driver to your system.
Changing the temperature
You can start out by using the climate control the same way you’d use a regular thermostat.
To change the temperature:
On an interface’s Room screen, select Comfort. The climate controls open.
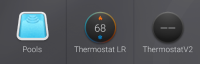
- If you have more than one thermostat in the system, select the one you want to control.
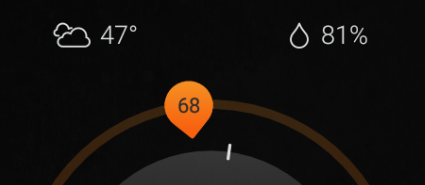
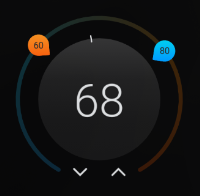
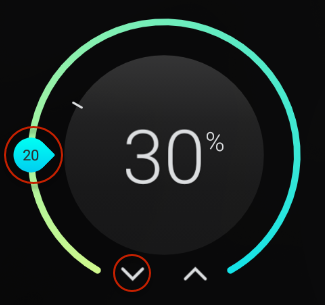
Move the orange “heat” set point or the blue “cool” set point indicator to the temperature you want. (The temperature tick mark indicates the current room temperature.)
- OR -
Use the up and down arrows
 to adjust both set points simultaneously.
- OR -
Select the current temperature in the center of the circle, and when the heat and cool set point values appear, select one and use the up and down arrows to adjust only that set point.

Tip: The "heat" set point is the temperature at which the HVAC system starts heating, and the "cool" set point is the temperature at which it starts cooling.

Changing the indoor humidity
To change the humidity:
On an interface’s Room screen, select Comfort. The climate controls open.
- If you have more than one thermostat in the system, select the one you want to control.
- In the Thermostat screen, select Humidity at the top of the screen. The Humidity screen opens and displays the current indoor humidity and humidity set point.
Tap the icon on the left to toggle between Humidifying and Dehumidifying.
To change the desired humidity set point, either move the teardrop-shaped set point indicator or use the up and down arrows.


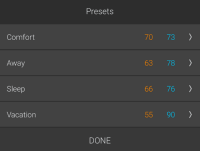
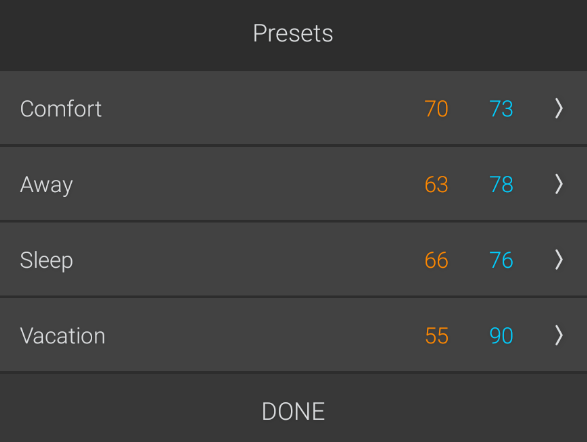
Creating and using climate presets
Presets are a powerful and flexible way to save all of your climate settings, including heat and cool set points, fan mode, and humidity settings, for easy recall later. With one touch, you can recall the right settings for any mood or activity, or you can schedule them. Presets make it easy for your home to respond to your life—you are no longer bound to a rigid, time-based schedule.
To use, create, or edit a preset:
In a room’s home view, select Comfort, then Thermostat, then select Preset at the bottom of the screen. The preset list appears, showing your currently available presets (if any).
- To select a preset, select the preset in the list. The preset is applied.
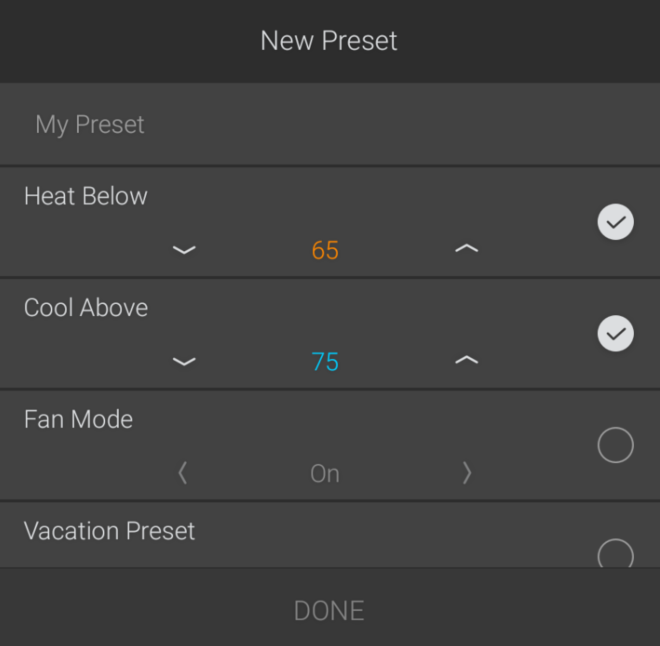
To create a new preset:
Tap the
 (edit) icon. The Presets list opens.
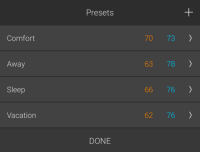
Tap the
 (add) icon. The New Preset screen opens.
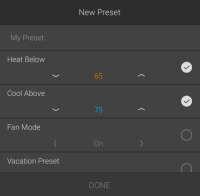
- In the My Preset field, type a new name for the preset you are creating.
- Set the temperatures at which you want the heat and cooling to turn on, the fan mode, and whether this preset will act as a vacation preset, then tap DONE.
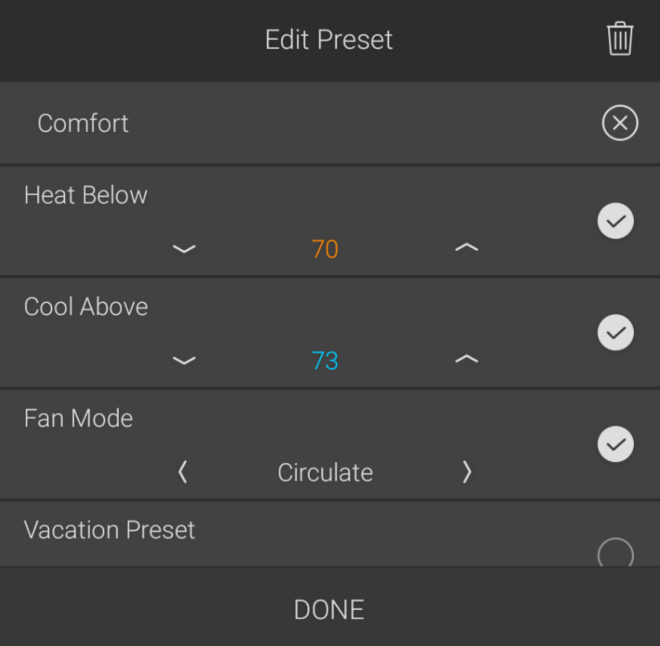
To edit a preset:
- Select the (edit) icon. The Presets list opens.
Select the preset to edit. The Edit Preset screen opens.

- Adjust the temperature, humidity, and fan settings, then tap DONE.
- Select the

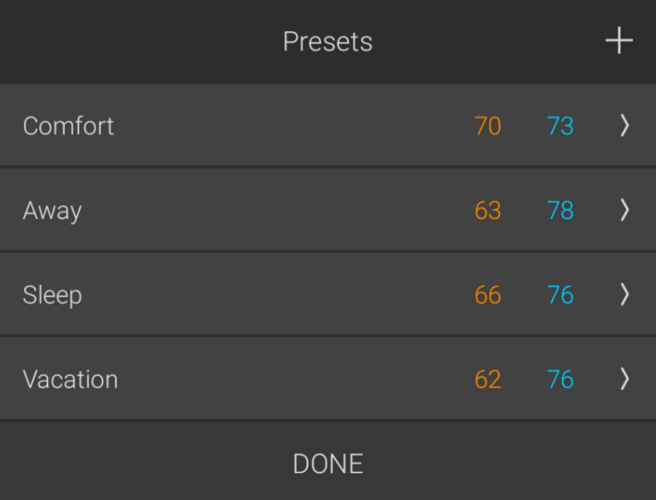
To use a preset:
In a room’s home view, select Comfort, then Thermostat, then select Preset at the bottom of the screen. The preset list appears, showing your currently available presets.
- Select the desired preset. The preset is applied.
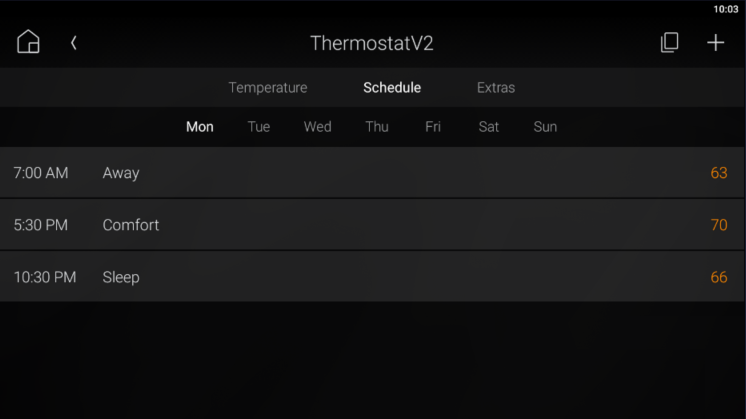
Setting schedules
A schedule is a range of times associated with a climate preset. Creating a schedule is simple after you’ve created your presets.
![]() Video: Scheduling the Thermostat
Video: Scheduling the Thermostat
To create or edit a schedule:
In a room’s home view, select Comfort, then Thermostat, then select Schedule at the top of the screen.
- Select the day of the week to apply the preset schedule to. A list of current schedules for that day appears.
To add a schedule, select the
(add) icon at the top of the screen.- OR -
To edit an existing schedule, select the desired preset from the list.
- Set the time you want the preset applied, then select NEXT (if creating a new schedule) or DONE (if editing an existing schedule).
Select the preset you want to use at that time, then select Done. Repeat the process for all events for that day.
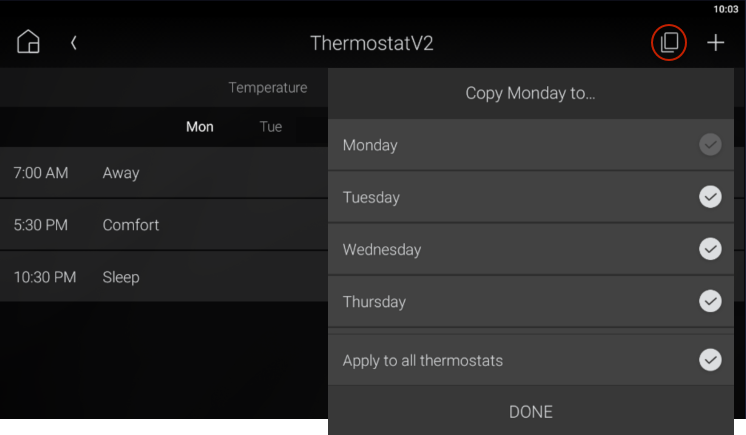
Tip: After creating schedules for a full day, you can copy the schedule to other days and thermostats.
To copy a day’s schedule:
- In the thermostat screen, select Schedules and the day to copy from.
Select the
 (copy) icon. The Copy to... list opens.
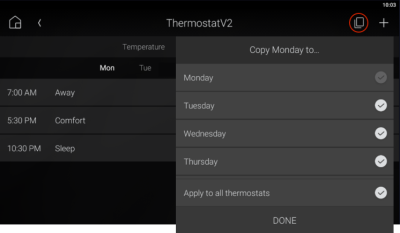
- Select each day you want to copy the schedule to (indicated by check marks).
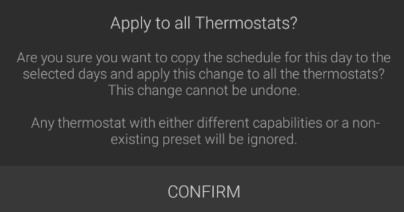
If you have multiple thermostats and want to copy the schedule to all thermostats, select Apply to all thermostats.
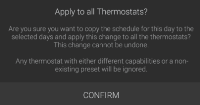
Important: The presets that the schedule uses exist on the other thermostats before the schedule is copied to them.
- Select DONE.
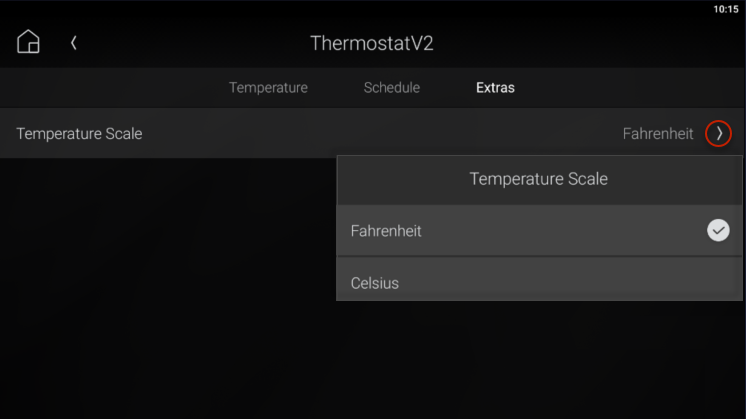
Changing the temperature scale
To change the temperature scale used in the menus and settings:
In a room’s home view, select Comfort, then Thermostat, then select Extras at the top of the screen. The Temperature Scale setting opens.

- Select Temperature Scale, then select Fahrenheit or Celsius.
Favoriting the thermostat to a Room screen
To add the thermostat as a favorite to a room screen:
- Select a room to control, then select Comfort. The climate controls open.
Press and hold the thermostat's icon, then select Favorite to Room.

The thermostat is added to the Room screen.

Control4 Wireless Thermostat by Aprilaire
The Control4 Wireless Thermostat by Aprilaire is a reliable, sophisticated device that consistently delivers the right level of comfort in the most efficient way possible. With advanced presets and scheduling, the thermostat works with you instead of forcing you to fit climate control into a rigid schedule.
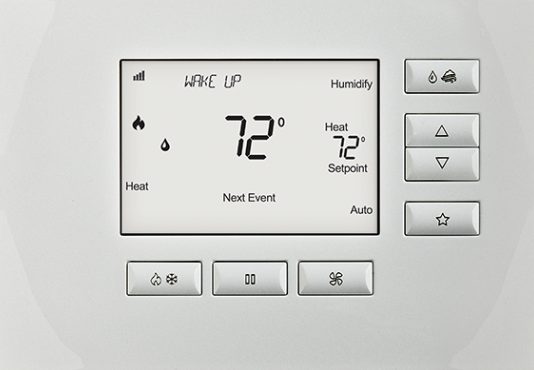
- Enhanced compatibility with modern HVAC systems, including forced air, geothermal, dual fuel, and humidity control systems
- Control heating, cooling, ventilation, humidification, and dehumidification (with compatible HVAC systems)
- Easily adjust heat and cool set points, fan control, and humidity mode right at the thermostat
- Backlit LCD displays the temperature, operating mode, and status of HVAC, Indoor Air Quality control, fan, and hold
- Complementary design with Control4 lighting products
- Can be easily mounted in a utility closet with an optional remote temperature sensor
If you have this thermostat installed, you can learn more about its operation in the thermostat user guide.
Related Articles
Using Google Assistant voice control
Using Google Assistant voice control Google Assistant uses natural language recognition to understand your requests, so a wide variety of words and phrases can accomplish the same task. Start off by speaking the usual attention phrase to your Google ...Using Amazon Alexa voice control
Using Amazon Alexa voice control To view available voice commands, click View Voice Commands. Log in to your account at customer.control4.com. Under Automation, select Amazon Alexa. In the Alexa Skill Configuration section, click View Voice Commands. ...Using the Control4 Room screen
Using the Control4 Room screen Most of the Control4 visual interfaces have a Room screen. The Room screen categorizes your automated home’s features under several icons. (There are some small differences between interfaces). Video: Basic Navigation ...Using Spotify
Using Spotify You’ll need Spotify Premium to use Spotify Connect. See the details overleaf. Streaming using a smartphone To stream Spotify using a smartphone: Make sure that your smartphone is connected to the same Wi-Fi network as your Control4 ...Using filters
Using filters You can use filters to simplify your home control device views. Note: Filter settings are "sticky"—after you select filter settings, the next time you open the same screen from any room, the interface applies the previously selected ...